Last updated: February 2026 · Applies to version 1.0.2+
1. What Is SmartyPress AI Engine?
SmartyPress AI Engine is a free AI content generator plugin that brings OpenAI (ChatGPT) and Deepseek directly into your WordPress Gutenberg editor. It helps bloggers, marketers, agencies, and developers create high-quality content faster using artificial intelligence.
With this free AI engine you can:
- Generate titles, full articles, excerpts, and categories from the editor toolbar
- Edit inline with Magic Wand — enhance, correct, translate, expand, or condense any block
- Bulk generate up to 50 posts at once with a single click
- Use custom prompts with variables for precise control over AI output
- Switch between OpenAI and Deepseek providers and models at any time
The plugin is completely free and open source. You only pay for API usage to your chosen AI provider.

2. Installation & Setup
Install the Plugin
From WordPress.org:
- Go to Plugins → Add New in your WordPress admin.
- Search for “SmartyPress AI Engine”.
- Click Install Now, then Activate.
Manual installation:
- Download the plugin ZIP file.
- Go to Plugins → Add New → Upload Plugin.
- Upload the ZIP, install, and activate.
Configure Settings
- Go to SmartyPress AI → Settings in the WordPress admin menu.
- Enter at least one API key (OpenAI or Deepseek — see next section for step-by-step instructions).
- Choose your Default Provider (OpenAI or Deepseek).
- Select a Default Model (e.g., GPT-4o, GPT-4o Mini, Deepseek Chat).
- Adjust Temperature (0–2; lower = more precise, higher = more creative; default: 0.7).
- Set Max Tokens (default: 2000; up to 32,000 for long content).
- Enable Post Types where the AI engine should be available (Posts, Pages, or Custom Post Types).
- Click Save Settings.

3. How to Get API Keys (OpenAI & Deepseek)
SmartyPress AI Engine requires at least one API key to generate content. You can use OpenAI, Deepseek, or both.
OpenAI API Key
- Go to platform.openai.com.
- Sign up for an account or log in.
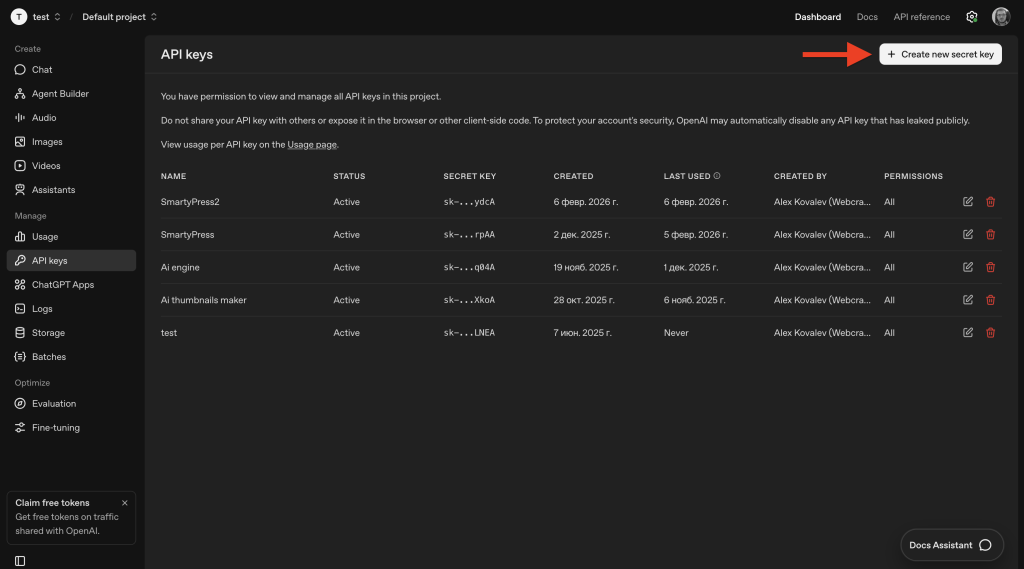
- Navigate to Settings → API Keys (or go directly to platform.openai.com/api-keys).
- Click “Create new secret key” and give it a name (e.g., “SmartyPress”).
- Copy the key immediately — it starts with
sk-...and is shown only once. - Go to Billing and add credits (minimum $5 to start).
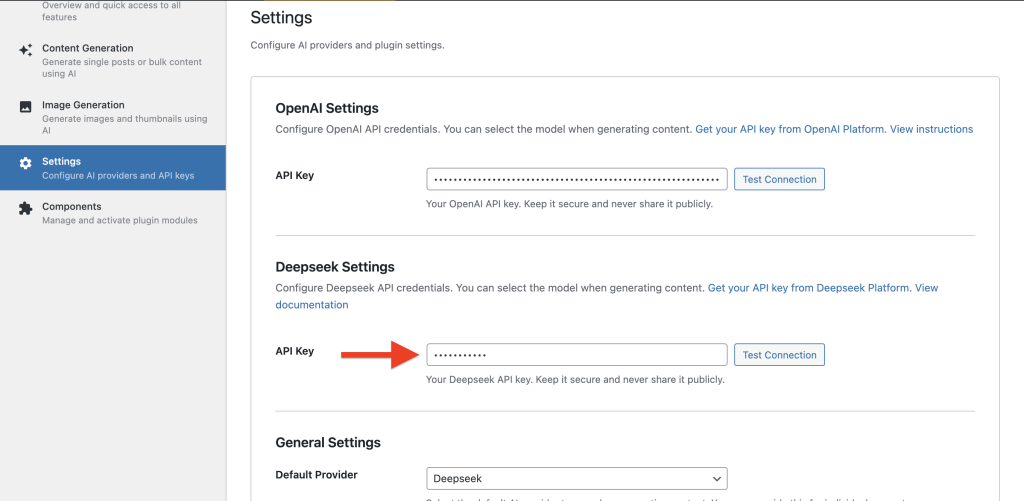
- Paste the key into SmartyPress AI → Settings → OpenAI API Key.
Deepseek API Key
- Go to platform.deepseek.com.
- Sign up for an account or log in.
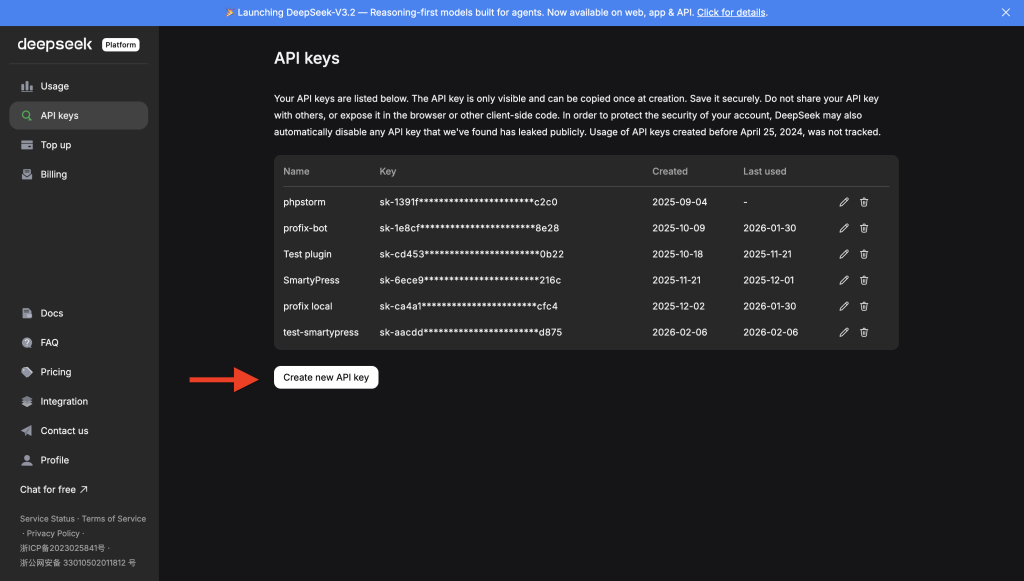
- Navigate to API Settings.
- Click “Create API Key”.
- Copy the key immediately.
- Add credits to your balance (Deepseek is significantly cheaper than OpenAI).
- Paste the key into SmartyPress AI → Settings → Deepseek API Key.
Tip: You can use both providers at the same time. Switch between OpenAI and Deepseek when generating — use GPT-4o for critical content and Deepseek Chat for affordable bulk generation.
4. Method 1: SmartyPress AI Writer Toolbar Button
The fastest way to generate content while editing a post or page.
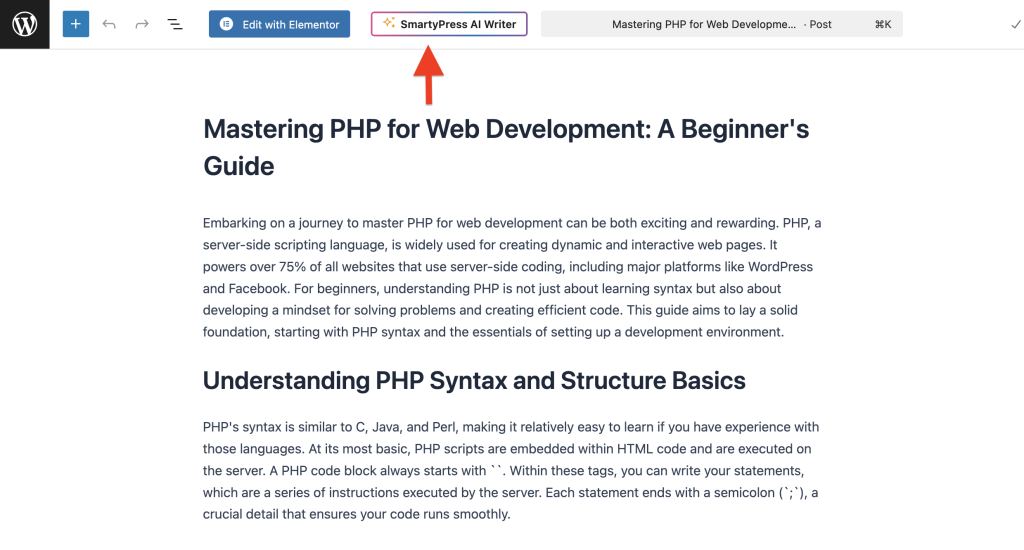
Where to Find It
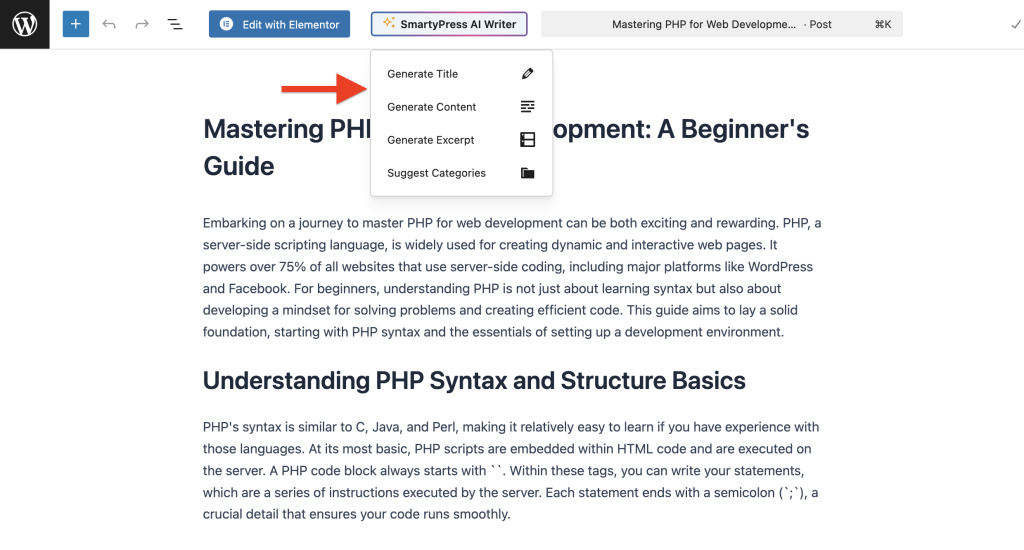
Open any post or page in the Gutenberg editor. Look for the “SmartyPress AI Writer” button in the top editor toolbar. It has an orange sparkle icon with an animated gradient border.
Dropdown Menu
Click the button to reveal a dropdown menu with four AI content generation options:
| Action | What It Does | Requirements |
|---|---|---|
| Generate Title | Creates an SEO-optimized title for your post | Always available |
| Generate Content | Generates a full article with headings and paragraphs | Requires a title |
| Generate Excerpt | Creates a short summary (1–2 sentences) | Requires content |
| Suggest Categories | Suggests up to 3 relevant categories from existing ones | Requires title + content |
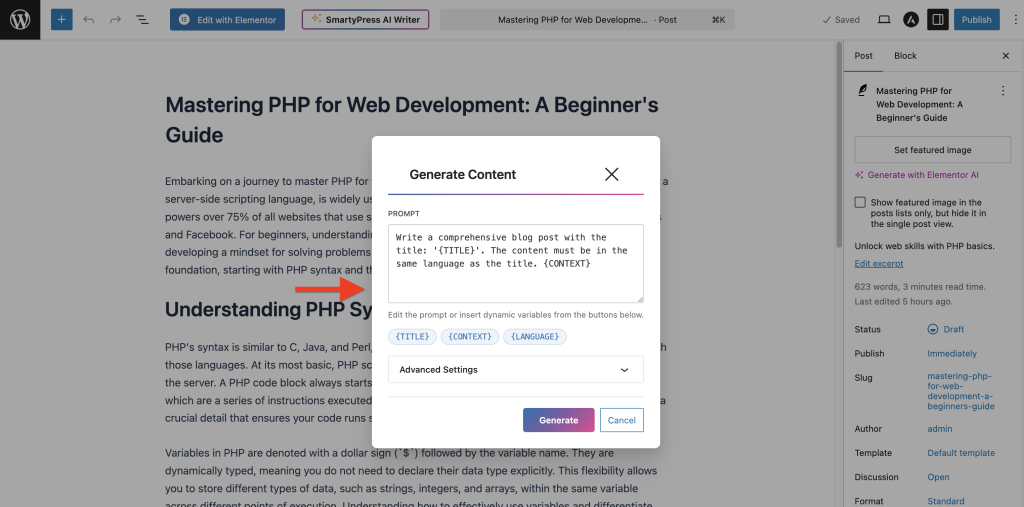
The Generator Modal
After selecting an action, a modal window opens with:
- Prompt textarea — pre-filled with a default prompt; fully editable.
- Variable buttons — click to insert variables like
{TITLE},{CONTEXT},{CATEGORIES}into your prompt (see Prompt Variables). - Advanced Settings (collapsible) — change the AI provider, model, and temperature for this specific generation.
- Generate button — click to send the prompt and insert the result.
5. Method 2: Magic Wand (Inline Editing)
Magic Wand lets you transform any block content with AI without leaving the editor. It is the most powerful feature of SmartyPress AI Engine for everyday content editing.
Supported Blocks
Magic Wand works with these Gutenberg blocks:
- Paragraph
- Heading (H1–H6)
- List (ordered and unordered)
- Quote
- Code
- Preformatted
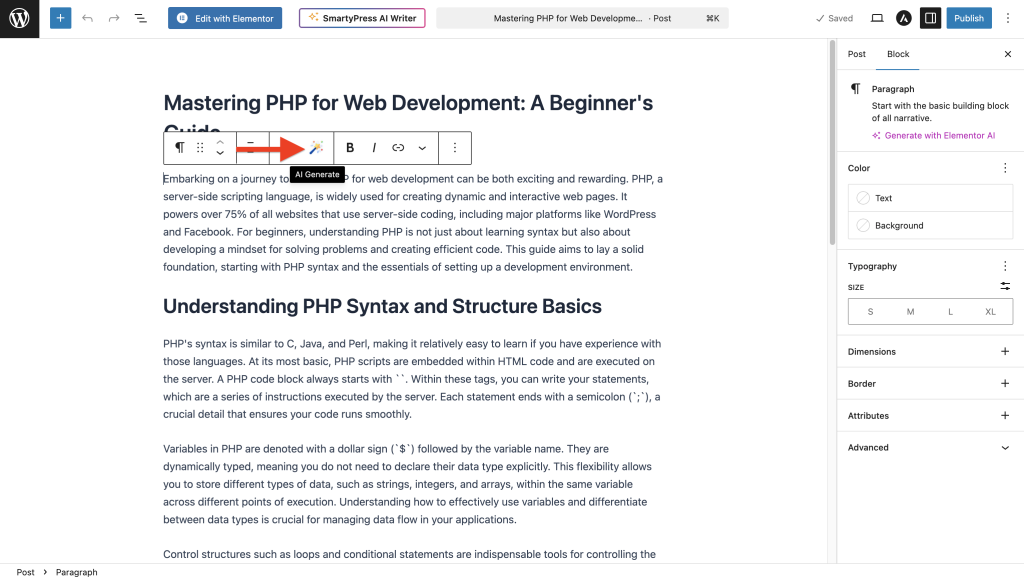
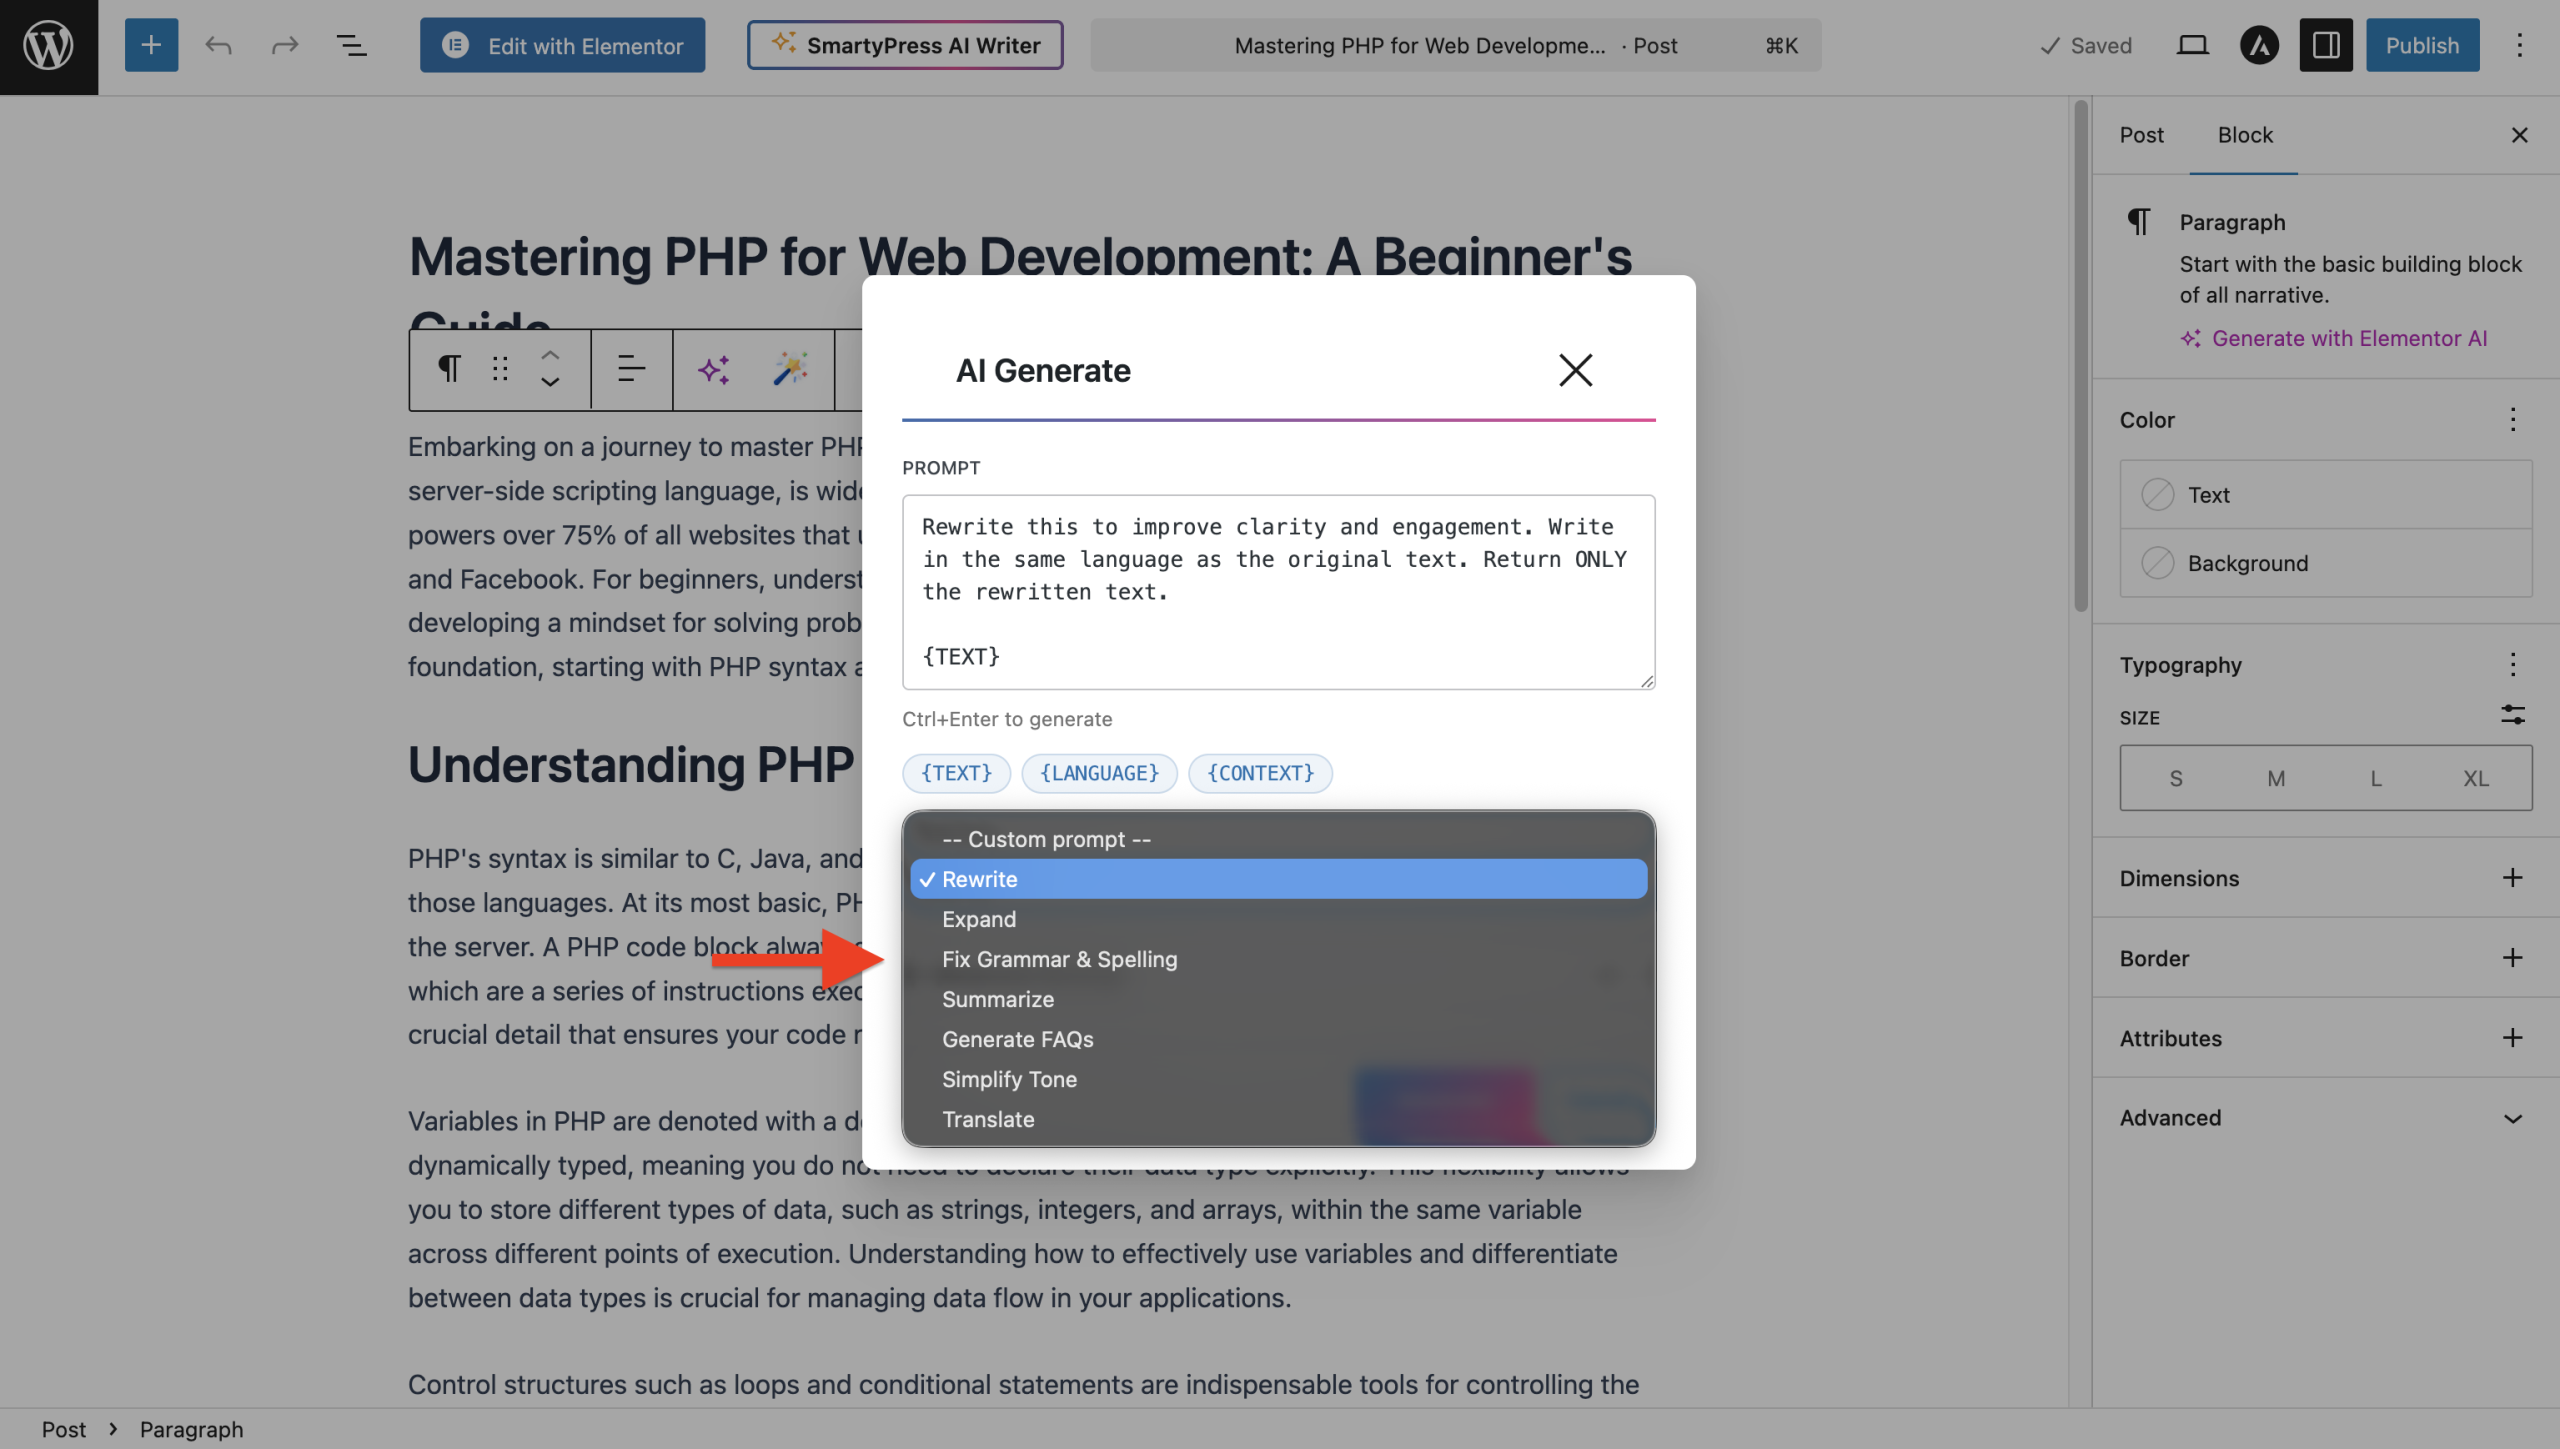
How to Use Magic Wand
- Click on any supported block in the editor.
- In the block toolbar, click the wand icon (“AI Generate”).
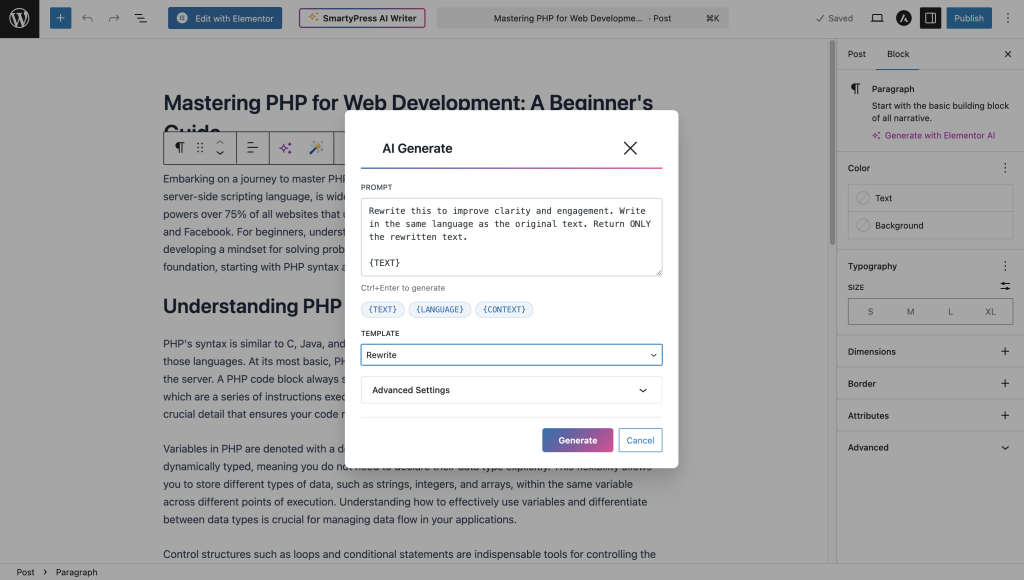
- A modal window opens with a template dropdown and prompt editor.
- Choose a pre-built template or write a custom prompt.
- Adjust provider, model, and temperature in Advanced Settings if needed.
- Press Generate (or Ctrl+Enter / Cmd+Enter).
- The result replaces your block content or appears as suggestions.
Pre-Built Templates (7)
| Template | What It Does |
|---|---|
| Rewrite | Rewrites text for clarity and engagement |
| Expand | Adds details, examples, and depth |
| Fix Grammar & Spelling | Auto-corrects grammar and typos |
| Summarize | Condenses text to 3–5 sentences |
| Generate FAQs | Creates 5–7 Q&A pairs in Markdown |
| Simplify | Rewrites in a friendly, simple tone |
| Translate | Translates text to a target language |
All Magic Wand Actions (10+)
Replace Mode (result replaces block content directly):
- Generate Content — create new content from a custom prompt
- Enhance Text — improve readability and quality
- Correct Text — fix grammar and spelling
- Longer Text — expand content to ~3x length
- Shorter Text — condense to ~50% length
- Translate Text — translate to any language
- Generate Alt Text — create image alt text
Suggest Mode (shows multiple variants to choose from):
- Generate Title — get 5 SEO-optimized title suggestions
- Generate Excerpt — get 3 excerpt variants
- Suggest Synonyms — get 5 synonym options
Keyboard Shortcuts
- Ctrl+Enter (or Cmd+Enter on Mac) — Generate
- Esc — Close modal
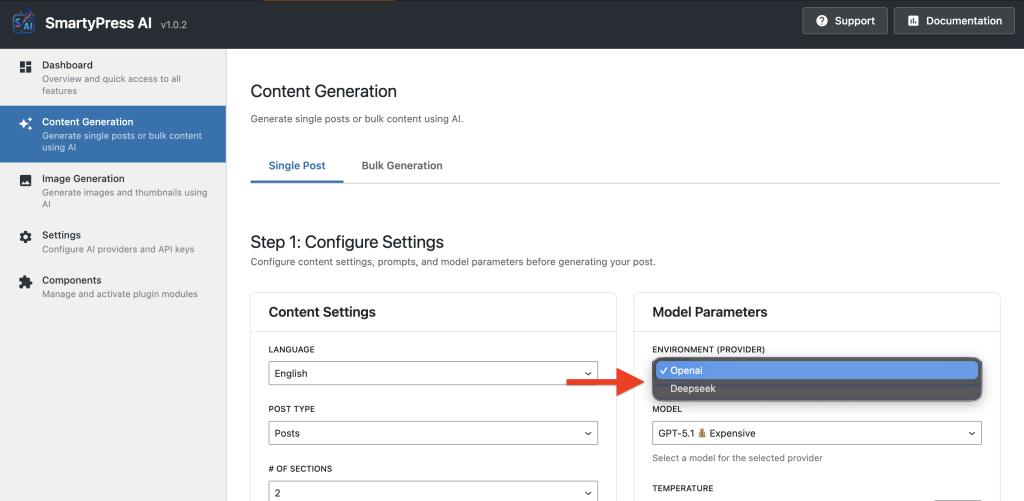
6. Method 3: Single Post Generation (Content Generation Page)
Generate a complete post with title, structured content, and excerpt in a guided 3-step process.
Go to SmartyPress AI → Content Generation (or click the “Create Post with AI” button on the Posts page).
Step 1: Settings
- Language — select English, Russian, German, French, Spanish, or enter a custom language.
- Post Type — Post, Page, or any enabled custom post type.
- Number of Sections (1–5) — how many H2 sections the article should have.
- Paragraphs per Section (1–5) — depth of each section.
- Provider & Model — override the default provider and model for this generation.
- Temperature (0–1) — control creativity.
- Max Tokens — limit the response length.
- Custom Prompts — edit prompts for title, sections, content, and excerpt with variable support (see Prompt Variables).
Step 2: Topic & Context
- Topic — enter the main subject of your post (e.g., “WordPress Security Best Practices in 2026”).
- Context (optional) — add extra instructions or context for the AI (e.g., “Focus on free tools and beginner-friendly tips”).
- Click Generate to start.
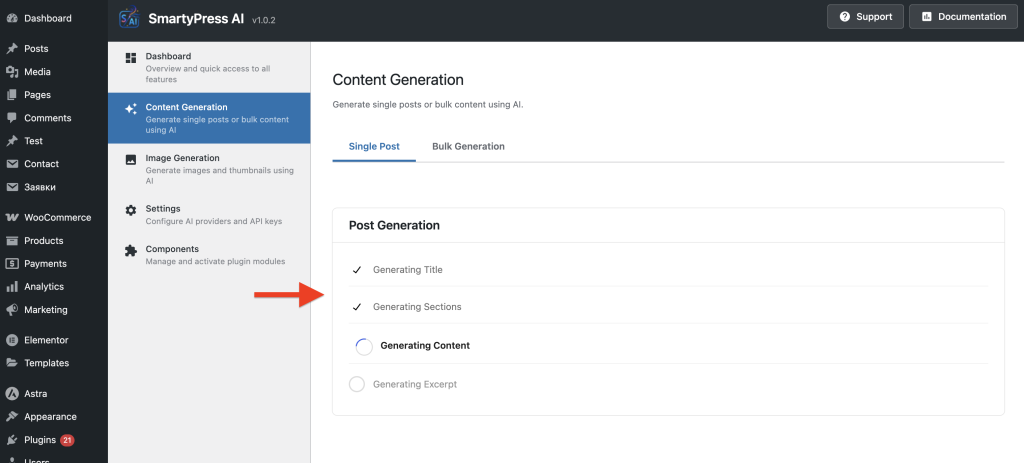
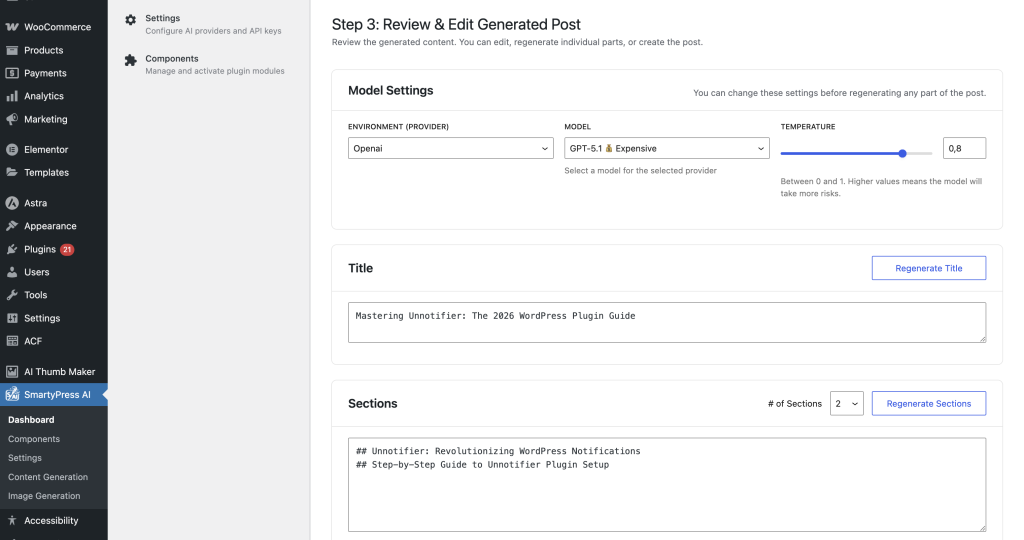
Step 3: Preview & Publish
- Review the generated title, content, and excerpt — all are editable.
- Select categories and post status (Draft, Publish, etc.).
- Click Regenerate if you want a new version.
- Click Create Post to save it to WordPress.
- A success modal shows with a link to edit or view the post.
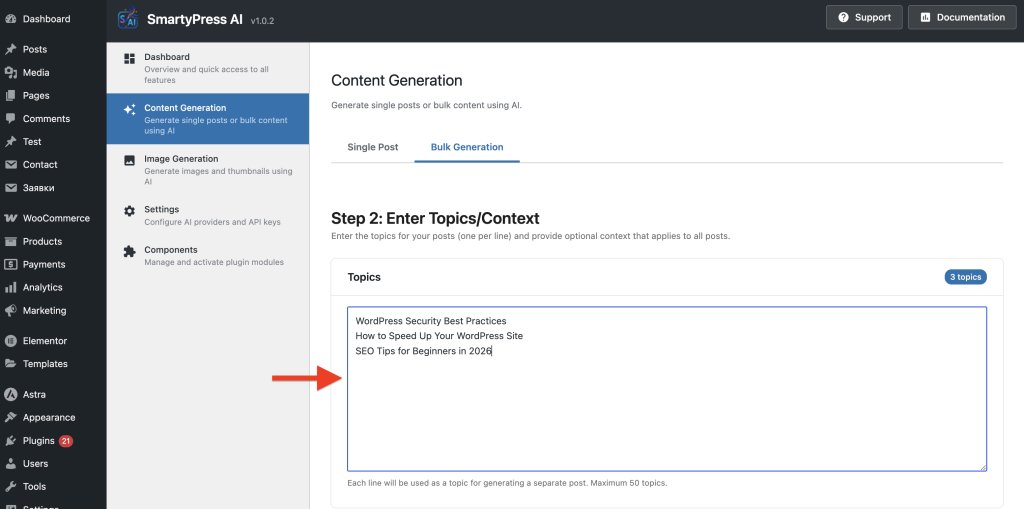
7. Method 4: Bulk Post Generation
Generate multiple posts at once — perfect for building content at scale.
Go to SmartyPress AI → Bulk Generator.
- Configure settings: provider, model, post type, post status, and author.
- Enter topics (one per line, up to 50):
WordPress Security Best Practices
How to Speed Up Your WordPress Site
SEO Tips for Beginners in 2026
- Optionally add context that applies to all posts.
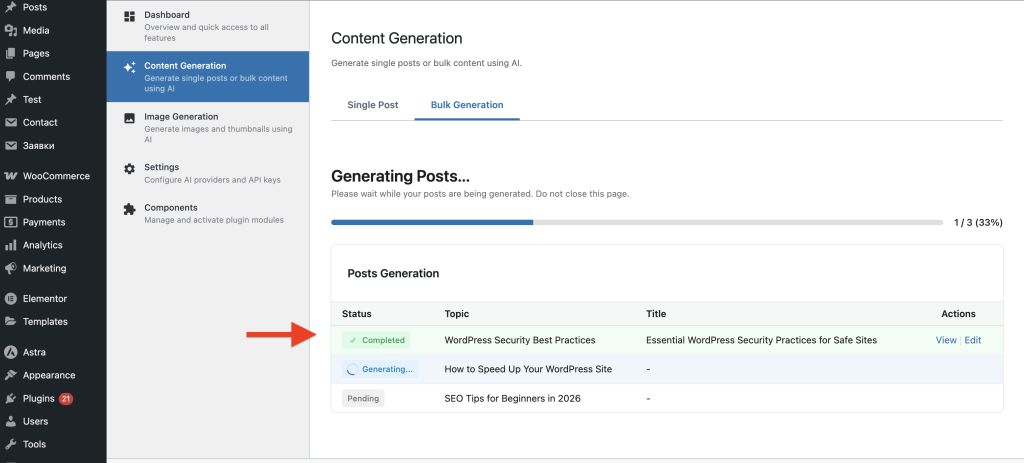
- Click Generate Posts.
- Watch real-time progress as each post is generated.
- Review the summary with links to all created posts.
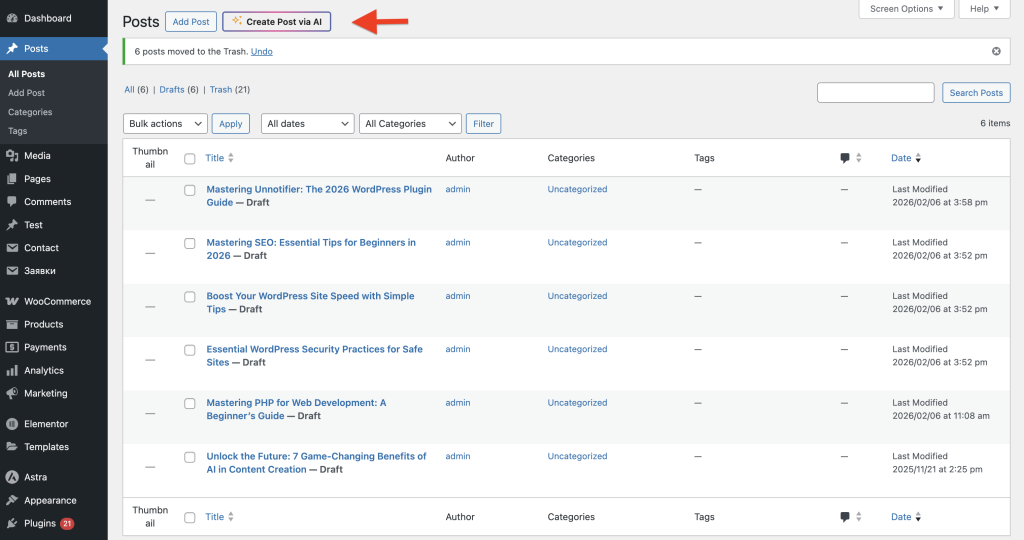
8. Quick Access: “Create Post/Page with AI” Buttons
On the Posts and Pages list screens (wp-admin/edit.php), you will see a button with an animated gradient border next to the standard “Add New” button:
- Create Post with AI — on the Posts list page
- Create Page with AI — on the Pages list page
Clicking it takes you directly to the Content Generation page where you can generate a full post or page with AI in three steps.
9. Prompt Variables Reference
SmartyPress AI Engine uses variables in prompts — placeholders that get replaced with real data from your post before sending to the AI. You can insert them by clicking variable buttons in the modal or typing them manually.
AI Writer Variables (Toolbar → Generator Modal)
| Variable | Replaced With | Use Case |
|---|---|---|
{TITLE} |
Current post title | Generate content or excerpt based on the title |
{CONTEXT} |
Post content snippet (up to 1,500 characters) | Give AI context about the post topic |
{EXCERPT} |
Current post excerpt | Refine or regenerate the excerpt |
{CATEGORIES} |
List of existing site categories | Suggest relevant categories for the post |
Magic Wand Variables (Block Toolbar → Wand Modal)
| Variable | Replaced With | Use Case |
|---|---|---|
{TEXT} |
Selected text or full block content | The main content for AI to process |
{CONTEXT} |
Surrounding block context or post content | Help AI understand the broader context |
{LANGUAGE} |
Target language for translation | Specify language for Translate action |
Single Post Generator Variables (Content Generation Page)
| Variable | Replaced With | Use Case |
|---|---|---|
{TOPIC} |
Topic entered by the user | Main subject for title and content generation |
{TITLE} |
AI-generated title | Used in content and excerpt prompts |
{LANGUAGE} |
Selected generation language | Ensure content is generated in the right language |
{CONTEXT} |
Additional context from user | Provide extra instructions or focus areas |
{SECTIONS} |
List of generated section headings | Used in content prompt for structured articles |
{SECTIONS_COUNT} |
Number of sections (1–5) | Tell AI how many sections to create |
{PARAGRAPHS_PER_SECTION} |
Paragraphs per section (1–5) | Control content depth per section |
{CONTENT} |
Generated article content | Used in excerpt prompt to summarize the article |
How it works: When you click Generate, the AI engine replaces all {VARIABLE} placeholders in your prompt with real data from your post, then sends the complete prompt to the AI provider. This allows you to build flexible, reusable prompts that adapt to any content.
10. Supported AI Models
OpenAI Models (12)
| Model | Type | Best For |
|---|---|---|
| GPT-5.1 | Premium | Highest quality output |
| GPT-5 | Premium | Advanced content generation |
| GPT-4.1 | Premium | High-quality articles and copy |
| O3 | Reasoning | Complex analytical content |
| O3 Mini | Reasoning | Cost-effective reasoning tasks |
| O1 Preview | Reasoning | Advanced reasoning and analysis |
| O1 Mini | Reasoning | Lightweight reasoning |
| GPT-4o (default) | Standard | Best balance of quality and cost |
| GPT-4o (Nov 2024) | Standard | Specific snapshot version |
| GPT-4o Mini | Budget | Fast, affordable everyday tasks |
| GPT-4 Turbo | Premium | Long-form content with large context |
| GPT-3.5 Turbo | Budget | Cheapest option for drafts and bulk |
Deepseek Models (2)
| Model | Best For |
|---|---|
| Deepseek Chat (default) | General content generation (very affordable) |
| Deepseek Coder | Technical and code-related content |
Recommendation: Start with GPT-4o for quality or GPT-4o Mini for budget. Use Deepseek Chat for bulk generation — it is 10–50x cheaper than OpenAI for comparable quality.
11. Tips & Best Practices
Write Effective Prompts
| Bad Prompt | Good Prompt |
|---|---|
| Write something | Write a 300-word introduction about WordPress security best practices for beginners |
| Improve this | Improve this text to sound more professional and add technical details about performance optimization |
| Translate | Translate to Spanish maintaining a formal business tone |
Choose the Right Model
- Marketing copy & landing pages → GPT-4o or GPT-5 (higher quality)
- Blog posts & articles → GPT-4o or GPT-4o Mini (good balance)
- Drafts & bulk content → GPT-4o Mini or Deepseek Chat (most affordable)
- Technical & analytical content → O3 or O1 models (reasoning capability)
Optimize Costs
- Use Deepseek Chat for bulk generation — it is significantly cheaper than OpenAI.
- Lower Max Tokens when generating short content like titles or excerpts.
- Use GPT-4o Mini instead of GPT-4o for routine tasks — it is ~10x cheaper.
- Write specific prompts — shorter, focused prompts use fewer tokens and produce better results.
12. For Developers
WordPress Filters
SmartyPress AI Engine provides filters to customize behavior:
// Customize the prompt for any action
add_filter( 'smartypress_ai_prompt_generate_title', function( $prompt, $params ) {
    return 'Create a clickable, SEO title for: ' . $params['topic'];
}, 10, 2 );

// Modify AI parameters (temperature, max_tokens, model)
add_filter( 'smartypress_ai_wand_params', function( $params ) {
    $params['temperature'] = 0.5;
    return $params;
});

// Add custom Magic Wand actions
add_filter( 'smartypress_ai_wand_features', function( $features ) {
    $features['myCustomAction'] = array(
        'label'   => 'My Custom Action',
        'prompt'  => 'Do something custom with: {TEXT}',
        'mode'    => 'replace',
    );
    return $features;
});
REST API Endpoints
| Method | Endpoint | Permission |
|---|---|---|
| POST | /smartypress/v1/generate-title | edit_posts |
| POST | /smartypress/v1/generate-content | edit_posts |
| POST | /smartypress/v1/generate-excerpt | edit_posts |
| POST | /smartypress/v1/generate-categories | edit_posts |
| POST | /smartypress/v1/wand | edit_posts |
| POST | /smartypress/v1/bulk-generate | publish_posts |
| GET/POST | /smartypress/v1/settings | manage_options |
13. Frequently Asked Questions
Is SmartyPress AI Engine free?
Yes, the plugin is completely free and open source. You only pay for API usage to OpenAI or Deepseek based on their pricing (typically $0.001–$0.10 per generation).
Do I need both API keys?
No, you need at least one. You can use OpenAI only, Deepseek only, or both and switch between them.
How much does content generation cost?
- Generating a title: ~$0.001–$0.01
- Generating a full article (500–1000 words): ~$0.02–$0.10
- Deepseek is 10–50x cheaper than OpenAI for similar quality.
Does Magic Wand work with the Classic Editor?
No, SmartyPress AI Engine requires the Gutenberg block editor (WordPress 5.0+).
What languages are supported?
AI models support all major languages. Specify the language in your prompt or select it in the Content Generation settings. The plugin interface is available in English and Russian.
Can I use it with WooCommerce products?
Yes, enable “Products” in the Post Types setting. You can generate product descriptions, titles, and other content.
Is my data safe?
Yes. Data is sent to AI providers only when you click Generate. No background requests, no tracking, no analytics. API keys are stored in your WordPress database only. All communication uses HTTPS.
What happens if I uninstall the plugin?
All plugin settings and API keys are deleted. Generated content (posts, titles, excerpts) is kept — it is your content.